

Pretty Pictures! One of my favorite things. Here is an easy and affordable way to flood objects with even, diffused light and make loveliness happen.
Light Box Supplies:
Large cardboard box (mine was 26" L x 16" W x 16" H).
White fabric, paper or fabric interfacing/stabilizer that diffuses light (I used midweight fabric stabilizer).
Posterboard or a large roll of non-translucent paper (I used a roll of paper that was too thin).
2-3 lamps In order to have matching light coming from each side, it is helpful to use similar light bulbs if not similar lamps. If you don't have 3 lamps available, skip cutting the window on top. It is not absolutely necessary to have light coming from above but having one does eliminate more shadows than without it.
Tools:
Pencil
Ruler
Box cutter or X-Acto knife
Scissors
Cutting mat
Steps:
1. A. Place the box on its side. The lid flaps can be helpful in controlling the light that reflects onto the front of the object so you want to keep them intact. You will be cutting windows on the left and right of the box opening. (Option to cut a third window on the top of the box).
B. Before deciding what size to cut your windows, make sure they are less than the width of the material you are using as a diffuser to make certain the hole you cut can be completely covered.
C. Measure the dimensions of the box to center the windows.
2. Mark and cut the windows out of the cardboard with the box cutter.
3. Tape the raw edges of the cardboard down to prevent rough shadows.
4. Mark and cut the diffuser material and tape it over the windows.
5. Trim down the posterboard or paper that you are using as background to fit inside the box. Tape it to the back of the inside of the box. Carefully avoid wrinkling the background.
6. Optional: Cover the side opening flaps of the box with white background poster board/paper for an extra bounce of adjustable light on the object.


7. Pictured below is my light set-up. The light above the box is an older OttLite magnifying clamping lamp that I use in my craft room. I am blessed to have professional LED panel lights that I used for side lighting, but that isn't necessary at all.


In the picture below, you can see I closed the lid flaps tight around me to bounce light from the sides to the front of the bottles.

Because this is just a box with a bit of tape and paper, you can choose to fold it and store it or make a new one the next time you need one.
Lessons I Learned in the Process
1. I realized after I had taped down the raw edges of the box that the yellow masking tape I used might add unwanted reflected color to the light--so I used a thick Sharpie to re-color them black.
2. My pale skin was also reflecting light in a way that wasn't helpful so I put on a long-sleeved shirt.
3. Next time I will either use two layers of paper for the background or purchase a thicker poster board to avoid the slightly grainy look.
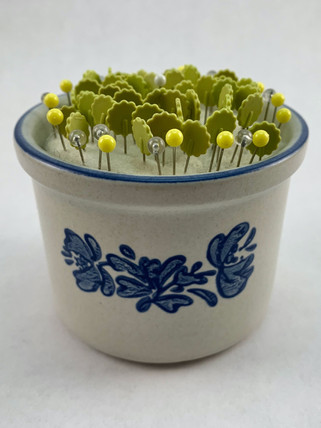
4. It is super fun to take pictures of random objects with the light box!


Comments